What a n00b!

Migrating Mail and Contacts from Hotmail to Zimbra

For anyone wanting to switch their email address from a free hotmail account to a Zimbra mail account without losing any email the switch can be made quite easily. You'll need a Windows installation and your Hotmail and Zimbra account info to get started. You can also find info on migrating out of Zimbra Desktop and into an IMAP server here.

Install and setup Windows Live Mail

Hotmail does not offer POP or IMAP access to its free accounts any longer, so we'll need to use the offline client from Microsoft as the go-between to transfer the mail. First, download the Windows Live Mail client and install it. Setting up Windows Live Mail to sync with your Hotmail account is fairly straight-forward, or instructions can be found here.

Add your Zimbra account

Next, you'll want to add the Zimbra account you want to migrate into. At the main page of Windows Live Mail and on the left-hand side of the window you will see a button that says "Add e-mail account" at the bottom of the list of folders.

When you click on that, it will bring up the "Add an E-mail Account" wizard. In the first screen you can fill in the account information and check the box that says "Manually configure server settings for e-mail account."

After clicking Next, you will fill in the settings for the mail server. The mail server, ports, and other info you will need to find from your email server administrator, but be sure to use the full email address followed by "/tb" for the username. This will cause Zimbra to set the correct timestamp in the mail listing after the import. Click 'OK' on the folder selection window.

Drag-and-drop mail

For the mail portion of the migration, you can simply "drag-and-drop" the mail items from the Inbox of your Hotmail account in the list on the left to the Inbox (or appropriate folder) on the freshly created Zimbra account. To do this, you can select the top message, scroll to the bottom, hold down shift and click the last message to select all and drag them in to the new Inbox. The transfer may take some time depending upon how much email is in your account and the speed of the connection to both of the servers.

Export contact to .csv

To export the contacts out of Hotmail, you can click on the "Contacts" button on the bottom-left of the Windows Live Mail window, click the menu button in the contacts window, select "Export" and click on "Comma Separated Values (.CSV)".

In the CSV Export wizard window, click on browse to select a location and filename to export the contacts to and click Next.Be sure to select all the fields (a lot of the fields are not exported by default) and click "Finish".  It will then dump a csv file of your contacts to the location you specified.

Import .csv into Zimbra

Log into your Zimbra account on the web interface. Navigate to the Preferences section and go to the Import/Export tab. In the import section of the page, select "Contacts" as the type and select "Outlook contacts" in the drop-down menu.

You can then click on "Browse" and navigate to the file you created earlier and select it. Next, click on import. It will ask you which contact list to import into. Select the contact list you would like and click on "OK". If everything goes well, you will see a green box appear saying that the import succeeded.

If you navigate over to the Address Book section of Zimbra you'll see your newly imported contact list.

Uptime In Windows

One of the many things that has annoyed me about Windows is the lack of an "uptime" utility like UNIX or Linux machines. There are a lot of scenarios where I need to find out quickly the last time the system had been rebooting without having to grep through logs.. err.. scroll through the Event Viewer. One trick that I picked up recently was that the systeminfo utility will tell you the uptime and you can parse out all the extra junk. I know this tip works on Windows 2003 Server and Windows XP, but I don't have access to a lot of other Windows platforms (and didn't bother checking earlier ones). You can simply run from a command prompt: systeminfo | find "Up Time".

Parallels 4 vs. VMware Fusion 2

Parallels recently released version 4 of their desktop virtualization software promising 50% better performance over the old version. I have used both VMware on Linux and Parallels on Mac for some time and decided to put them to test on the same system using VMware Fusion and Parallels Desktop 4. My hardware was a Core 2 Duo MacBook at 1.83Ghz with 2GB of RAM. The machines were stored on an external hard drive attached via FireWire. My host OS was Mac OS X 10.5.5 and I used 32-bit Ubuntu 8.10 desktop as the test guest OS. I gave each machine access to both cores and 1GB of RAM. Most of my tests were very unscientific, but general observations about the usability of the machines in each software.

General Speed Observations

Since I wanted to start with fresh installs, the first step was to lay down an install of Ubuntu. I didn't take any time measurements during the installer, but the installer in VMware was noticeably faster than Parallels. After the installation, I did a quick test of the boot speed of each. Ubuntu booted in 1 minute 28 seconds from the time I clicked the power button to when it was usable in Parallels and 1 minute 20 seconds in VMware. Really, there's not a lot of difference there. VMware was also slightly slower when I opened OpenOffice 2.4. In Parallels, it took 11 seconds before it was usable compared to 9 seconds in VMware.

Driver Installation

The Parallels tools and VMware tools installations were significantly different. The Parallels tools installation was a very simple menu-driven installer from the terminal. It took just a couple of minutes to install and a quick reboot and we were up and running. The VMware tools installer was easy as well, but a bit longer with a few more options. After the first install, the mouse driver wouldn't let the cursor leave the guest when it got to the edge of the machine window. I had to update the Ubuntu kernel to make it work. Upgrading the kernel was definitely recommended anyway, but I thought it would be worth noting.

File Transfer

I opened up SSH on my OS X box so Ubuntu detected it from the "Places" menu in Gnome as an SFTP server. I logged in and transferred an .iso file from my home directory over to the guest. The file was 637MB. I transferred the file in Parallels in 3 minutes 7 seconds and transferred it using VMware in 2 minutes 15 seconds. VMware wins again. VMware also allowed drag-and-drop files from OS X to the Ubuntu guest. Parallels didn't offer support for that and neither offered drag-and-drop transfers going back. I transferred the .iso again using drag-and-drop to the VMware machine and it ran almost as fast as the SFTP transfer, transferring in 2 minutes 18 seconds.

Video Performance

No performance test involving Linux would be complete without glxgears. Surprisingly, the tests seemed to swing the opposite way and Parallels excelled at this test. VMware ran glxgears at a mere 155FPS, but the Parallels guest was able to run at 231FPS.

Summary

VMware seemed to be slightly faster in booting and launching applications, but Parallels had simplicity and video responsiveness on its side. The VMware tools were slightly more involved to install and had to be copied to the guest and extracted and Parallels tools slightly more simply. The VMware drivers also required me to update before automatically moving the cursor from the virtual guest to the host at the edge of the screen. However, VMware did allow the user to drag files from OS X into the virtual guest. Unfortunately, without running Windows you don't get a lot of the features that VMware and Parallels offer, but support for Linux in both seems to be coming along nicely.

UPDATE:

Thanks to Pete from VMware who pointed out that there was a newer build of VMware available (the software did not prompt me for an update). I updated to the new version and Unity works great. Unity from the VMware platform was a definite plus since it allows applications from the guest to be in separate windows alongside the windows from the host OS. I did notice that video was quite a bit more choppy when in Unity view and glxgears showed around 127-128FPS rather than the 155 that I was seeing without it turned on, but the system was still usable. One thing that happened to me with the newer version of VMware tools was that when I clicked on any of the menus in Gnome and went down the list, it would consistently click the mouse for me. Eventually it stopped, but fairly annoying for just a few minutes.

With this new-found freedom, I decided to have a little bit of fun with Unity. I have Office 2007 installed using CrossOver so I quick downloaded a trial of Apple iWork to show off a little bit of diversity:

Increasing Ext3 I/O Performance

In today's computers, CPU throughput and amount of memory are no longer the bottleneck in performance. Ask any server administrator and they will tell you that one of the biggest concerns with responsiveness of server-side applications is the throughput to and from disk. If you're using the ext3 filesystem, it turns out there's a tip that you can use to gain up to a 40% performance boost.

With the default mount options in most distributions, the filesystem will log the last access time to a file. Hackosis recently wrote a quick tutorial on how to disable the access logging in the /etc/fstab file. A little research shows reveals a conversation in 2007 between kernel developers such as Linus Torvalds and Ingo Molnar in which Ingo states his experience with changing the setting:

yeah, it's really ugly. But otherwise i've got no real complaint about

ext3 - with the obligatory qualification that "noatime,nodiratime" in

/etc/fstab is a must. This speeds up things very visibly - especially

when lots of files are accessed. It's kind of weird that every Linux

desktop and server is hurt by a noticeable IO performance slowdown due

to the constant atime updates, while there's just two real users of it:

tmpwatch [which can be configured to use ctime so it's not a big issue]

and some backup tools. (Ok, and mail-notify too i guess.) Out of tens of

thousands of applications. So for most file workloads we give Windows a

20%-30% performance edge, for almost nothing. (for RAM-starved kernel

builds the performance difference between atime and noatime+nodiratime

setups is more on the order of 40%)

Using the Hackosis' tip on disabling the access logging could help boost performance on any systems you have using ext3. Of course, I'd recommend trying it out in a test system before deploying it in a production system, especially since changing the options means you have to re-mount your filesystems. I usually use ReiserFS, but if you are using something like Red Hat or CentOS, the kernel builds don't support the xfs, jfs, or reiser filesystems unless you compile the options in yourself. Granted, you have to have a "RAM-starved" system first as Ingo states, but if you are experiencing performance issues on a server, there's a good chance it's a RAM-starved system or low I/O throughput.

Migrating Mail from Zimbra Desktop to IMAP Server

The Zimbra Desktop mail client is a great mail client that gives the look and feel of the Zimbra Collabroation Suite, but the migration path out of the client has been less than easy. I wrote up a quick tutorial on steps that I took to help someone pull their email they had downloaded via POP into ZD and had gotten stuck there.

To do the export of the data, I used the built-in export utility inside of Zimbra Desktop. For the migration into an IMAP account (or a Zimbra Collaboration Server account) I used Thunderbird with the MboxImport enhanced add-on. I'm assuming you have already setup the account in Zimbra Desktop and pulled down the emails you want to export. I'm using Mac OS X to do the export, though it should work assuming you can get a file to extract the gzipped tarball from Zimbra Desktop.

First, I started with exporting from Zimbra Desktop. I went to the Account Setup page using the bottom on the top-right.

In the account setup screen, click on the account you want to migrate.

On the bottom-left, click on the Manage Data button.

Click on Export.

Type in the name you want to give the file, then click on Export.

Then you'll be prompted to save the file. Save the file wherever you would like. Mine saved to my Downloads directory.

For some reason, it didn't actually name the file the way it was supposed to when I downloaded it it, so I renamed the file to example.tar.gz and double-clicked it to extract. If you're using Windows, 7-zip can extract the file.

When you extract the file, you can open the folder and find directories for each folder of the mail you had. Inside those folders, there will be .eml files for each email. If you have more than 500 messages in a folder, the export breaks them up into multiple folders and append a number to the end of the name.

Now we're ready to import into Thunderbird. It's useful at this point if you account is setup already, but not necessary. First, we'll have to create a temporary local folder to import into. Right-click on the Local Folders in Thunderbird and click on New Folder. You can name it whatever you like, it will be cleared out eventually anyway.

Then, select the new folder we created. Then, in the Thunderbird menu, go to Tools -> Import/Export in mbox/eml format -> Import all eml files from a directory -> also from its sottodirectories.

When prompted, navigate to your extract Zimbra Desktop export directory and click Choose.

The utility will import your messages into the temporary directory.

Depending upon the server that you are using, you may have to be careful with drag-and-dropping your messages into your IMAP account. You can do it, but beware: it may mess up timestamps on messages. For Zimbra we have a little trick we can use. When setting up the account, simply append "/tb" to the end of your username. For my example, my email address was example@whatan00b.com, so my username that I used to authenticate was "example@whatan00b.com/tb". Once you know how about the consequences of drag-and-drop inside your mail client, just drag all of your messages into their appropriate folders. Here's my messages now in the Zimbra web client:

Zimbra In an Hour

After spending a great deal of time the Zimbra forums helping others setup DNS and other assorted issues to get Zimbra servers up and running, I decided to create a quick tutorial on how to get up and running with Zimbra on Ubuntu 8.04.

For my installation, I'm using zimbra.whatan00b.com as my hostname and my IP is 10.211.55.9. I'm going to use i386 Ubuntu 8.04 server and Zimbra OS 5.0.7 (Zimbra 5.0.9 was actually released for the Ubuntu 8.04 platform during my writing, but at the beginning, 5.0.7 was the newest package available.). I used Webmin for management of the DNS server. it's a little bit overkill for this project, but it seems to give beginners to bind some 'training wheels' for (hopefully) a slightly less steep learning curve. A small amount of Linux knowledge and comfort with the command line is required.

The partitioning and installation is outside the scope of this tutorial, but to begin I did a default install and picked the DNS server and SSH server "bundles" during the installation. You can run Zimbra on an existing web server if you should choose, but it gets a little more complicated and is outside the scope of this document. I am also assuming that the server is behind a NAT and you have properly configured all public-facing firewalls and DNS. For the setup, we will follow the Zimbra wiki steps on configuring a "Split DNS" for internal DNS resolution.

Before we get started, I want to add a disclaimer. This quick tutorial is meant for use in a proof-of-concept testing environment and to get a quick overview of the components necessary to get going. Please do not follow these steps and consider the machine production-ready. I do not cover setting up SSL on the web client or other services (the administration console uses SSL 'out of the box'). With that out of the way and since we only have an hour, let's get going.

We'll begin by pulling down the Zimbra installer. You can find the Zimbra open source installers here. That'll take a little while, so you can get that started running and flip over to a different terminal and keep moving once the download starts. For the current version at the time of writing, you can run:

wget http://downloads.sourceforge.net/zimbracommunity/zcs-5.0.7_GA_2450.UBUNTU8.FRANKLIN.tgz?modtime=1215025916&big_mirror=0

Now, we need to get rid of apparmor for Zimbra:

sudo apt-get purge apparmor

I then did a quick update just for good measure:

sudo apt-get update sudo apt-get upgrade

Next, we'll configure our local DNS server. For my example, I used Webmin to configure my zone(s). First, let's download and install webmin:

wget http://prdownloads.sourceforge.net/webadmin/webmin_1.430_all.deb dpkg --install webmin_1.430_all.deb

Dpkg will fail due to dependencies here, so we'll have to go get those:

sudo apt-get install libnet-ssleay-perl openssl libauthen-pam-perl libio-pty-perl libmd5-perl

Once completed, you can connect to Webmin using a web browser on another machine. Since my example server is at IP address 10.211.55.9, I'll connect to: https://10.211.55.9:10000. You can login with any user that has sudo access or with root.

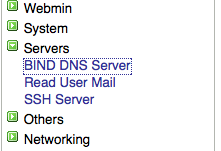
After logging in to Webmin, click on Servers, then click on "BIND DNS Server".
Then click on "Create master zone".
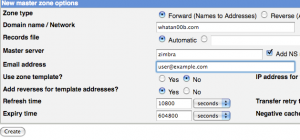
You will need to create an "Address" with the same name as your hostname.

Be sure to put a "." at the end of the FQDN. Then you'll need to add a mail server to your new zone:

You can leave the Name blank empty and fill in the hostname (with a "." at the end, remember) for the "Mail Server" blank and a priority of 10. Once you are done, apply the changes for the zone.

Next, we'll need to edit the /etc/resolv.conf file to point to our new DNS server. You can use your favorite editor to open the file, I used vim:

sudo vim /etc/resolv.conf

You will need to add a line at the beginning of the file or replace the first namserver line to read:

nameserver localhost

Now, you should be able to resolve your hostname and MX record for the zone you setup. To make sure, we'll do a dig on our domain:

wyatt@zimbra:~$ dig MX whatan00b.com

; <<>> DiG 9.4.2 <<>> MX whatan00b.com

;; global options:  printcmd

;; Got answer:

;; ->>HEADER<<- opcode: QUERY, status: NOERROR, id: 12138

;; flags: qr aa rd ra; QUERY: 1, ANSWER: 1, AUTHORITY: 1, ADDITIONAL: 1


;; QUESTION SECTION:

;whatan00b.com.         IN  MX


;; ANSWER SECTION:

whatan00b.com.      38400   IN  MX  10 zimbra.whatan00b.com.


;; AUTHORITY SECTION:

whatan00b.com.      38400   IN  NS  zimbra.


;; ADDITIONAL SECTION:

zimbra.whatan00b.com.   38400   IN  A   10.211.55.9


;; Query time: 1 msec

;; SERVER: 127.0.0.1#53(127.0.0.1)

;; WHEN: Mon Aug 18 22:39:28 2008

;; MSG SIZE  rcvd: 90


wyatt@zimbra:~$ dig zimbra.whatan00b.com


; <<>> DiG 9.4.2 <<>> zimbra.whatan00b.com

;; global options:  printcmd

;; Got answer:

;; ->>HEADER<<- opcode: QUERY, status: NOERROR, id: 51649

;; flags: qr aa rd ra; QUERY: 1, ANSWER: 1, AUTHORITY: 1, ADDITIONAL: 0


;; QUESTION SECTION:

;zimbra.whatan00b.com.      IN  A


;; ANSWER SECTION:

zimbra.whatan00b.com.   38400   IN  A   10.211.55.9


;; AUTHORITY SECTION:

whatan00b.com.      38400   IN  NS  zimbra.


;; Query time: 1 msec

;; SERVER: 127.0.0.1#53(127.0.0.1)

;; WHEN: Mon Aug 18 22:40:09 2008

;; MSG SIZE  rcvd: 74

Now that we can resolve our host, we'll need to setup our /etc/hosts file. You'll want to make sure that the hostname is set to what you want it to resolve as (mine is zimbra.whatan00b.com), then add it to the /etc/hosts file:

sudo vim /etc/hosts

Mine looks like this:

127.0.0.1 localhost 10.211.55.9 zimbra.whatan00b.com zimbra

We just need some prerequisites and we're ready to go:

sudo apt-get install fetchmail libpcre3 libgmp3c2 libxml2 libstdc++5 libltdl3

Now we're ready to rock with our actual Zimbra installation. Let's extract the installer and get going:

tar zxvf zcs-5.0.7_GA_2450.UBUNTU8.FRANKLIN.tgz cd zcs-5.0.7_GA_2450.UBUNTU8.FRANKLIN sudo ./install.sh

The installer will get going and have you accept the license agreement and check out prerequisites. If one is missing, you can do a quick sudo apt-get install for whatever package is missing. I accepted all the default packages (ldap, logger, mta, snmp, store, apache, spell). Then you'll want to type 'y' to continue the installation. The installer will then install the core packages on your system. Once that's done, we begin the configuration.

The first part of the configuration is the most crucial and problematic part to users: DNS setup. The installer will first try to do an MX lookup using your machine's hostname as the domain name. For my install, I changed the domain when prompted and changed it to "whatan00b.com":

DNS ERROR resolving MX for zimbra.whatan00b.com It is suggested that the domain name have an MX record configured in DNS Change domain name? [Yes] Create Domain: [zimbra.whatan00b.com] whatan00b.com MX: zimbra.whatan00b.com (10.211.55.9)

Interface: 10.211.55.9

Interface: 127.0.0.1

done.

You will then be taken to the Zimbra configuration wizard. You can set any of the preferences you like, but the only required one is to set the admin username. You use the numbers and letters to navigate the menus to set properties. To set the admin user password, you first type '3' to get to the Zimbra "Store configuration" menu, type '4' to set the password. Then you use 'r' to get back to the main menu and 'a' to finish. The installer will take some time to finish and the time it takes really depends upon the hardware you're using. I used a virtual machine inside Parallels on my MacBook so it took about half an hour to complete. At the end of the install it will start the services for you.

Once through the install, hop onto your favorite web browser and see if you can log in. For my instance, I navigated to: http://10.211.55.9 and up came the Zimbra sign-in page and logged in.
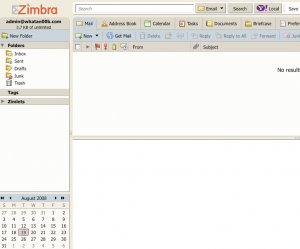
You can login to the administration console at https://10.211.55.9:7071 after accepting the self-signed certificates, of course. Once into the administration console, you can go ahead and start adding domains and users at will.
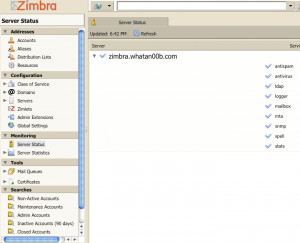
That's it! You're ready to start hacking away. If you're stuck on a step, feel free to ask in the comments below or post in the Zimbra forums.

More Info

For more info on tuning your Zimbra server, check out my article on tuning Zimbra to use fewer resources.

For do-it-yourself troubleshooting or a deeper understanding of what's going on in this setup, you may also want to check out my article on some of the pitfalls of Zimbra installation as well!

Clear DNS Cache OS X

DNS requests are cached in the local machines for all modern operating systems to allow for faster network performance so if a hostname is requested more than once within a certain amount of time (while the TTL is still good), the machine doesn't have to make a new DNS request. From time to time, DNS caches can become corrupt, or TTL is too high and a change is needed immediately. For these reasons, we need have the ability to flush the cache. The command is different to flush the cache on Leopard than on older versions of OS X. On Leopard, jump to a terminal by launching it from your Dock, browsing to it in the /Applications/Utilities directory in Finder and launching it, or you can bring up spotlight and search for Terminal. Once the Terminal window comes up, you can type the following command on Leopard:

dscacheutil -flushcache

Or on Tiger or older (10.4 or less) you can run:

lookupd -flushcache

Oversimplified NFS Server How-To

This how-to assumes that both systems are running Ubuntu, although it can be easily ported to work with other distributions. For our example, we will use two systems: ServerA and ServerB. ServerA will be the NFS "server" which will be used to store the actual data files and ServerB will connect to ServerA to use the files as though they are mounted locally. For our example, we will also assume that both servers are on the same private LAN with ServerA at IP address 10.10.0.2 and ServerB at 10.10.0.3.

NFS Server Installation

On the server side (ServerA) you'll need three core pieces of software. To install, as a user who has permission to sudo, run:

sudo apt-get install nfs-kernel-server nfs-common portmap

After the install finishes, it will start the portmap and nfs services. You can restart each by using the following commands respectively:

sudo /etc/init.d/portmap restart

sudo /etc/init.d/nfs-kernel-server restart

What's commonly referred to as shares in Windows is referred to an export in NFS. The key file to edit to setup your exports is going to be /etc/exports. Open up your exports file with your favorite text editor (replacing vim with the text editor of your choice if you like):

sudo vim /etc/exports

To allow ServerB to access /srv/data with read-write privileges, add the following line to the end of your /etc/exports file:

/srv/data 10.10.0.3 (no_subtree_check,rw)

You can allow the whole 10.10.0.x subnet by replacing 10.10.0.0/24 with the IP in the above line. Also, change the "rw" to "ro" to make the export read-only. Once you are done, export your newly exported filesystems:

exportfs -ra

Now we're ready to go to the "client" (ServerB).

NFS Client Installation

On your client end, you'll need to install the same software with the exception of the NFS server software:

sudo apt-get install nfs-common portmap

Once the software installs, portmap will start up and you're ready to go. For our example, we're going to assume you want to mount the export on the remote server to /home/shared. Now you can mount your export:

sudo mount 10.10.0.2:/srv/data /home/shared

Now your system ServerB has mounted a share on ServerA and can access data in the exported directory. Keep in mind that NFS bases permissions on the UID's on both end. A user with the same UID on each end will be required to read-write if you have the permissions set for write only to the owner. You can change permissions on ServerA using chmod.

Setting To Mount on Boot

In order for your NFS export to mount on boot, you'll want to add the NFS server in your /etc/fstab file. At the end of the file, for our example, you'll add a line like this:

10.10.0.2:/srv/data /home/shared nfs defaults 0 0

Be sure to do a test reboot before assuming this setup is ready for production!

Ubuntu Server Booting in Virtual Machine

I have recently been playing with several virtualization technologies and came upon an issue that I wanted to write about so I could help someone else who was having the same issues.

Symptoms:

When booting Ubuntu server guest OS, after GRUB loads the default kernel, you receive the following error:

<code>"PANIC: CPU too old for this kernel."</code>

Applies to:

Currently I've seen this issue happen in Parallels 3.0 on Mac and VirtualBox on Mac and Ubuntu as the host. I've seen it happen only with Ubuntu server 7.10, but it's very possible that it happens with others.

Workaround:

This appears to be a bug in either the Ubuntu server kernel or in the virtualization software. The current workaround is to install the generic kernel:

Boot from the CD using the "Rescue a broken system" option. Go through the regular options until you get to the rescue console. You will be prompted for the filesystem to use as the root filesystem. Choose your root filesystem and choose "Execute a shell in ". If you have a separate /boot partition, you will have to mount that before you can install the new kernel.

When at the prompt with your /boot partition mounted, type:

apt-get install linux-generic

This will install the generic kernel from the CD.

Once the install is done, reboot the system. When GRUB is loading, press "Escape" on the keyboard to open up the kernel prompt. Select the generic kernel you just installed (not the recovery mode option). The system will boot up with your new kernel.

Once the machine is booted up, you can login and use it as normal. You can change the GRUB settings to choose the generic kernel every time so you don't have to select it every time.

Open up /boot/grub/menu.lst in your favorite text editor. In the first few lines you will find a line that says "default 0". You can change the default to the one you need by counting up from zero in order of the kernel listing in the file. For me, the generic kernel was "2" (remember, it starts with 0). Once you change the value, you can reboot the machine to see if the right kernel was selected. If you changed it to the wrong one, you can always use the "Escape" key to select a kernel at boot.

Ubuntu Bundle Install After OS Install

Ubuntu server offers a great bundling feature during the installation to install a DNS server, LAMP (Linux, Apache, MySQL, PHP), and various other common packages for Linux servers. Often enough, administrators end up needing to either migrate a system to serve another purpose or add a service onto that server. A lot of those admins then go back to the manual "apt-get install" method of installing each of the packages in the bundle. Fortunately since Edgy, Ubuntu has included the tasksel utility to mitigate this problem. According to the Ubuntu documentation: "Tasksel is a software installation application that is an integral part of the Debian installer. It groups some packages by tasks and offers the user an easy way to install the packages for that task. It provides the same functionality as using conventional meta-packages."

Tasksel allows you to install the LAMP stack, DNS server, as well as the different desktop variations of Ubuntu such as Kubuntu, Xubuntu, and Edubuntu.

To use tasksel, simply jump to a terminal on your server and run as root (or sudo): "tasksel". It will bring up a prompt to select the packages you would like to install. You can use the arrows to scroll through the list and use the space to select a package. Packages with an "*" beside them will be or are already installed. Once you are done selecting your packages, hit tab and then enter to select "OK". Tasksel will begin to use apt to install the packages you have selected.

You can also use "tasksel install " to install the bundle you would like to install. Probably the most common would be: tasksel install lamp-server to install the LAMP stack onto your Ubuntu server.

screenshot