Zimbra In an Hour

      by Wyatt Walter

After spending a great deal of time the Zimbra forums helping others setup DNS and other assorted issues to get Zimbra servers up and running, I decided to create a quick tutorial on how to get up and running with Zimbra on Ubuntu 8.04.

For my installation, I’m using zimbra.whatan00b.com as my hostname and my IP is 10.211.55.9. I’m going to use i386 Ubuntu 8.04 server and Zimbra OS 5.0.7 (Zimbra 5.0.9 was actually released for the Ubuntu 8.04 platform during my writing, but at the beginning, 5.0.7 was the newest package available.). I used Webmin for management of the DNS server. it’s a little bit overkill for this project, but it seems to give beginners to bind some ‘training wheels’ for (hopefully) a slightly less steep learning curve. A small amount of Linux knowledge and comfort with the command line is required.

The partitioning and installation is outside the scope of this tutorial, but to begin I did a default install and picked the DNS server and SSH server “bundles” during the installation. You can run Zimbra on an existing web server if you should choose, but it gets a little more complicated and is outside the scope of this document. I am also assuming that the server is behind a NAT and you have properly configured all public-facing firewalls and DNS. For the setup, we will follow the Zimbra wiki steps on configuring a “Split DNS” for internal DNS resolution.

Before we get started, I want to add a disclaimer. This quick tutorial is meant for use in a proof-of-concept testing environment and to get a quick overview of the components necessary to get going. Please do not follow these steps and consider the machine production-ready. I do not cover setting up SSL on the web client or other services (the administration console uses SSL ‘out of the box’). With that out of the way and since we only have an hour, let’s get going.

We’ll begin by pulling down the Zimbra installer. You can find the Zimbra open source installers here. That’ll take a little while, so you can get that started running and flip over to a different terminal and keep moving once the download starts. For the current version at the time of writing, you can run:

wget http://downloads.sourceforge.net/zimbracommunity/zcs-5.0.7_GA_2450.UBUNTU8.FRANKLIN.tgz?modtime=1215025916&big_mirror=0

Now, we need to get rid of apparmor for Zimbra:

sudo apt-get purge apparmor

I then did a quick update just for good measure:

sudo apt-get update
sudo apt-get upgrade

Next, we’ll configure our local DNS server. For my example, I used Webmin to configure my zone(s). First, let’s download and install webmin:

wget http://prdownloads.sourceforge.net/webadmin/webmin_1.430_all.deb
dpkg --install webmin_1.430_all.deb

Dpkg will fail due to dependencies here, so we’ll have to go get those:

sudo apt-get install libnet-ssleay-perl openssl libauthen-pam-perl libio-pty-perl libmd5-perl

Once completed, you can connect to Webmin using a web browser on another machine. Since my example server is at IP address 10.211.55.9, I’ll connect to: https://10.211.55.9:10000. You can login with any user that has sudo access or with root.

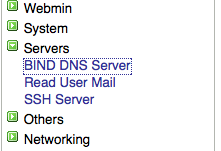
After logging in to Webmin, click on Servers, then click on “BIND DNS Server”.

Then click on “Create master zone”.

You will need to create an “Address” with the same name as your hostname.

Be sure to put a “.” at the end of the FQDN. Then you’ll need to add a mail server to your new zone:

You can leave the Name blank empty and fill in the hostname (with a “.” at the end, remember) for the “Mail Server” blank and a priority of 10. Once you are done, apply the changes for the zone.

Next, we’ll need to edit the /etc/resolv.conf file to point to our new DNS server. You can use your favorite editor to open the file, I used vim:

sudo vim /etc/resolv.conf

You will need to add a line at the beginning of the file or replace the first namserver line to read:

nameserver localhost

Now, you should be able to resolve your hostname and MX record for the zone you setup. To make sure, we’ll do a dig on our domain:

wyatt@zimbra:~$ dig MX whatan00b.com

; <<>> DiG 9.4.2 <<>> MX whatan00b.com
;; global options: printcmd
;; Got answer:
;; ->>HEADER<<- opcode: QUERY, status: NOERROR, id: 12138
;; flags: qr aa rd ra; QUERY: 1, ANSWER: 1, AUTHORITY: 1, ADDITIONAL: 1

;; QUESTION SECTION:
;whatan00b.com. IN MX

;; ANSWER SECTION:
whatan00b.com. 38400 IN MX 10 zimbra.whatan00b.com.

;; AUTHORITY SECTION:
whatan00b.com. 38400 IN NS zimbra.

;; ADDITIONAL SECTION:
zimbra.whatan00b.com. 38400 IN A 10.211.55.9

;; Query time: 1 msec
;; SERVER: 127.0.0.1#53(127.0.0.1)
;; WHEN: Mon Aug 18 22:39:28 2008
;; MSG SIZE rcvd: 90

wyatt@zimbra:~$ dig zimbra.whatan00b.com

; <<>> DiG 9.4.2 <<>> zimbra.whatan00b.com
;; global options: printcmd
;; Got answer:
;; ->>HEADER<<- opcode: QUERY, status: NOERROR, id: 51649
;; flags: qr aa rd ra; QUERY: 1, ANSWER: 1, AUTHORITY: 1, ADDITIONAL: 0

;; QUESTION SECTION:
;zimbra.whatan00b.com. IN A

;; ANSWER SECTION:
zimbra.whatan00b.com. 38400 IN A 10.211.55.9

;; AUTHORITY SECTION:
whatan00b.com. 38400 IN NS zimbra.

;; Query time: 1 msec
;; SERVER: 127.0.0.1#53(127.0.0.1)
;; WHEN: Mon Aug 18 22:40:09 2008
;; MSG SIZE rcvd: 74

Now that we can resolve our host, we’ll need to setup our /etc/hosts file. You’ll want to make sure that the hostname is set to what you want it to resolve as (mine is zimbra.whatan00b.com), then add it to the /etc/hosts file:

sudo vim /etc/hosts

Mine looks like this:

127.0.0.1 localhost
10.211.55.9 zimbra.whatan00b.com zimbra

We just need some prerequisites and we’re ready to go:

sudo apt-get install fetchmail libpcre3 libgmp3c2 libxml2 libstdc++5 libltdl3

Now we’re ready to rock with our actual Zimbra installation. Let’s extract the installer and get going:

tar zxvf zcs-5.0.7_GA_2450.UBUNTU8.FRANKLIN.tgz
cd zcs-5.0.7_GA_2450.UBUNTU8.FRANKLIN
sudo ./install.sh

The installer will get going and have you accept the license agreement and check out prerequisites. If one is missing, you can do a quick sudo apt-get install for whatever package is missing. I accepted all the default packages (ldap, logger, mta, snmp, store, apache, spell). Then you’ll want to type ‘y’ to continue the installation. The installer will then install the core packages on your system. Once that’s done, we begin the configuration.

The first part of the configuration is the most crucial and problematic part to users: DNS setup. The installer will first try to do an MX lookup using your machine’s hostname as the domain name. For my install, I changed the domain when prompted and changed it to “whatan00b.com”:

DNS ERROR resolving MX for zimbra.whatan00b.com
It is suggested that the domain name have an MX record configured in DNS
Change domain name? [Yes]
Create Domain: [zimbra.whatan00b.com] whatan00b.com
MX: zimbra.whatan00b.com (10.211.55.9)

Interface: 10.211.55.9
Interface: 127.0.0.1
done.

You will then be taken to the Zimbra configuration wizard. You can set any of the preferences you like, but the only required one is to set the admin username. You use the numbers and letters to navigate the menus to set properties. To set the admin user password, you first type ‘3′ to get to the Zimbra “Store configuration” menu, type ‘4′ to set the password. Then you use ‘r’ to get back to the main menu and ‘a’ to finish. The installer will take some time to finish and the time it takes really depends upon the hardware you’re using. I used a virtual machine inside Parallels on my MacBook so it took about half an hour to complete. At the end of the install it will start the services for you.

Once through the install, hop onto your favorite web browser and see if you can log in. For my instance, I navigated to: http://10.211.55.9 and up came the Zimbra sign-in page and logged in.

You can login to the administration console at https://10.211.55.9:7071 after accepting the self-signed certificates, of course. Once into the administration console, you can go ahead and start adding domains and users at will.

I want to add my disclaimer again. Please do not consider your new Zimbra server production-ready or this an all-inclusive tutorial on configuring Zimbra. More help on Zimbra configuration can be found at Zimbra’s wiki or forums. Have fun with your new Zimbra system!

Tags: , ,
Filed under How-Tos : Comments (17) : Aug 19th, 2008

17 Responses to “Zimbra In an Hour”

  1. n00by Says:

    Great!
    Exactly what I was looking for, but some images are missing.

    1 hour is very ambitious, btw ;)

  2. Wyatt Walter Says:

    Thanks, I just did a significant migration this weekend with the site and the images were still linked to my staging site URL.

  3. n00by Says:

    Thanks Wyatt, rather helpful. I was in the right place at the wrong time…

    Here some more n00by questions/remarks:

    - when setting up Ubuntu server, I’m asked for a hostname and a domain name. What would that be in your example? Does it matter at all?

    - is Zimbra expecting the SSH bundle to be installed? When using Webmin, I could omit SSH, I thought. I’m trying to keep the system simple and lean. N00by, I said ;)

    - on http://www.webmin.com/deb.html
    is explained how webmin installs using the usual apt-get method. I personally prefer this because it is consistent with the other packages and a bit easier to maintain, I guess.
    (Why isn’t Zimbra offering such a package? This could be Zimbra in 15 minutes, I guess)

    - what happens if there is already a DNS server running in this LAN (eg on the router). My LAN has one, my customer’s is using fixed IP addresses without DNS, currently.

    Background: I’m trying to set up a test-ZCS server in vmware for a customer, who needs an internal email/calendar etc application. The intranet there is not connected to the internet for security reasons, but my test-LAN is.

    I haven’t done much with linux so far, but I’m learning. The snapshot feature in VMWare comes very handy here.

    Thanks again
    Volker

  4. Wyatt Walter Says:

    Hi Volker,

    Glad to be of help. I’ll try to hit each one of your questions:

    1. For whatever reason, in the installer, Zimbra initially tries to resolve the hostname as the domain. In the example I changed the domain when prompted to whatan00b.com. Then the hostname was mail.whatan00b.com.

    2. Zimbra doesn’t necessarily need SSH to be installed, though it makes it a lot simpler to administer. If you’re using VMware, it’s a lot easier to manage remotely since you can use the admin console for it, but the SSH client will be a lot lighter on bandwidth. But no, you really don’t have to have SSH.

    3. Yes, you can install Webmin via apt-get, but in the past it’s always been a version or two behind which was why I chose to manually download and install it. Webmin manages updates for itself as well, but you can manage it however you choose. I would love to see Zimbra offer a Debian package through apt, but I’m not seeing a lot of admins calling for that in the forums or bugzilla so I’m guessing it’s not coming very soon..

    4. If you already have an internal DNS server, then you can just configure your zones on that DNS server and point your Zimbra server to that system for DNS. Then you can skip the Webmin setup which would make this how-to much faster. (I tried to assume that you were starting with nothing for the tutorial.) If you’re looking for a light-weight system, I’d opt for leaving Webmin off and SSH installed if you already have a DNS server.

    Hope this helps and thanks for the feedback! Another great place to get help is the Zimbra forums: http://zimbra.com/forums/

    Wyatt

  5. n00by Says:

    Wyatt,
    for 2. :
    After a while, I ran into what is described here:
    http://www.zimbra.com/forums/installation/16552-solved-remote-manager-port-22-issue.html

    Looks like SSH is requried, at least installing it resolved this problem.
    It’s quite a beast, this Zimbra.

  6. Wyatt Walter Says:

    Indeed, it looks like it is required. I guess I’ve never run a Linux server without SSH. Thanks for reporting back and sorry for leading you astray :)

  7. Set up Zimbra in an Hour! » DataSync Business News Says:

    [...] of our senior network administrators has published an extremely informative article about how to configure Zimbra Collaboration Suite in under an hour! Wyatt and the team have set up [...]

  8. OgreNaut Says:

    I too am quite the noob when it comes to MX records, mail servers, but I’m not a web development or *nix neophyte, so I CAN be taught! ;)

    When I get to the point where I dig my MX record, I get:

    ;; ANSWER SECTION:
    myname.com. 86400 IN MX 10 mx00.myhostingprovider.com.
    myname.com. 86400 IN MX 10 mx01.myhostingprovider.com.

    ;; AUTHORITY SECTION:
    myname.com. 172800 IN NS ns58.myhostingprovider.com.
    myname.com. 172800 IN NS ns57myhostingprovider.com.

    …where myname.com is a domain name that I currently have registered with my hosting provider, and is currently using their mail exchangers.

    I obviously need to modify the MX records with my hosting provider, but I’m a little lost on what I need to do exactly. Do I set the MX record to point to a domain name that points to my WAN address? (I have DSL with a dynamic WAN address, so I use a dynamic DNS service to update my WAN IP)

    Thanks in advance. Great HOWTO, BTW!

  9. OgreNaut Says:

    Okay, I made some headway and I thought I’d leave some comments about it for others that may be in distress:

    I answered my own question from above; for my domain name (myname.com), I changed the MX record with my domain name provider to point to my dynamic DNS host name (mydomain.no-ip.org). After waiting a bit for the changes to be applied, I did another “dig MX myname.com” from the Zimbra box. It still showed my old MX records (the ones that point to my hosting provider). It didn’t seem right, so I ssh’d into a university machine and tried the dig again. THIS time, it showed that myname.com is indeed pointing to mydomain.no-ip.org. I further tested it by using http://www.mxtoolbox.com. That site is nice because it spits back my dynamic DNS address AND the A record IP address for it. Alternatively, I could’ve just relied on the IP address resulting from pinging mydomain.no-ip.org.

    So, somewhere in my local network, I have a DNS cache that needs to flushed. I’m thinking I should’ve omitted the setup of BIND on the Zimbra box and instead just pointed it to my Tomato-equipped router, which handles all of the DNS requests for the rest of the network. This was alluded to by Wyatt, in response to one of n00by’s questions, I just didn’t get it until now! :P

    Another note on my mention of a DSL connection: I’ve tested port 25 and it works fine when forwarded to an ssh server, so it should work fine for mail as well. I have Qwest DSL service in MN, for reference.

  10. OgreNaut Says:

    Aarrggghhh!!!

    I just found this info the blacklist-check lookup results of mxtoolbox.com:

    “Ref: PBL191664

    [my WAN address (omitted)]/20 is listed on the Policy Block List (PBL)

    Outbound Email Policy of Qwest for this IP range:

    It is the policy of Qwest that email sent from a dynamically assigned IP address should be sent out only via the designated outbound mail server allocated to Qwest customers. To find the hostname of the correct mail server to use, customers should consult the original signup documentation as provided by their ISP or contact Qwest Technical Support.”

    Looks like I’ll have to use a relay for outgoing mail. Lame.

  11. Wyatt Walter Says:

    Hi OgreNaut,

    Glad to hear you got your question answered.

    I use a similar setup for my personal Zimbra server and I don’t even try to send out using my box anymore. My parents have Qwest at their house and I have a box there for backups and their IP changes twice a day sometimes. It’s tough being on a dynamic IP. If you have the money and really want to run your own mail server, I’d suggest springing for a static (clean) IP address. Luckily I work for a Zimbra provider and can just use their IPs :)

    Thanks for the feedback and good luck!

  12. sub-mit-it.com » Blog Archive » Open Source Email Done Right Says:

    [...] easier to setup and debug than Exchange. With a little bit of Linux experience, you can even setup Zimbra in an hour! Zimbra is very flexible and its architecture allows it to be split across several servers to [...]

  13. sub-mit-it.com » Open Source Email Done Right Says:

    [...] easier to setup and debug than Exchange. With a little bit of Linux experience, you can even setup Zimbra in an hour! Zimbra is also built to be clustered and each part can be separated out onto a separate server to [...]

  14. Software Experts » Blog Archive » Open Source Email Made Easy Says:

    [...] easier to setup and debug than Exchange. With a little bit of Linux experience, you can even setup Zimbra in an hour! Zimbra is also built to be clustered and each part can be separated out onto a separate server to [...]

  15. Benefits of Open Source Collaboration : Digital Disco Bash Says:

    [...] have a little bit of Linux experience. With a little bit of Linux experience, you can even setup Zimbra in an hour! Zimbra is very flexible and its architecture allows it to be split across several servers to [...]

  16. OgreNaut Says:

    Thought I’d just provide some follow-up after having used my Zimbra setup for while. I CAN send out going mail through port 25 with Qwest, so they’re not actively blocking the port. The only downside that I can see is if a recipient or an intermediate server is using the blacklist (spamhaus) that my IP range is on, my mail won’t make it through. Darn regulations!!! The cool thing is that this has given me the experience to deploy Zimbra to my small business clients. I’ve been singing the praises of Zimbra to several, and can’t wait to get them off their clunky Exchange dependencies. Thanks for the GREAT write-up!

  17. Open Source Email Done Right : TXAstro Says:

    [...] have a little bit of Linux experience. With a little bit of Linux experience, you can even setup Zimbra in an hour! Zimbra is also built to be clustered and each part can be separated out onto a separate server to [...]

Leave a Reply